Background
Redash is a very good BI tool, official docker version of one key installation , eliminating the manual installation of redash packages, Celery, Redis, Postgres db component of trouble. However, because I am not familiar with docker, how to continuously store the data saved to postgres database by redash in docker at the end of docker’s life cycle has baffled me. If this problem is not solved, once there is a problem after the product is launched, I will be fired by my company.
![]()
So I came up with another way, namely redash, celery, Redis service deployment using official docker script, and then use the postgres database installed on host machine. I did it by trial and error. I’m sharing the whole process now, hoping to help friends like me. Skilled gods, please ignore.
My English is very poor. I am very sorry if I will caused any trouble to you !
Environment:Centos7 / Mac OS 10.15.3 → Chrome
Step 1: install docker and docker-compose
See official documents
The Mac system is simple, direct to download the desktop version (seems more than 500M), then a graphical interface to install directly, once installed, it contains the docker-compose tools.
Centos, if you follow the official instructions, is pretty simple.
Step 2: install npm nodejs
See official documents
Installation process may step on some pits, Please help yourself !
Step 3: install postgres
See official documents
Once installed, create a database such as “redash_v8” for later use
Step 4: download the redash source code
git clone https://github.com/getredash/redash.git
#  Note that the downloaded default codes is the master branch of redash;
# which is the latest redash(currently V9 by 2020-04-19),;
# and production is better with the stable version of V8.
# Switch to version v8 with the following instructions

cd redash
git checkout --track remotes/origin/release/8.0.x
Step 5: modify the docker-compose.yml file
The docker-compose.yml file is under the redash directory
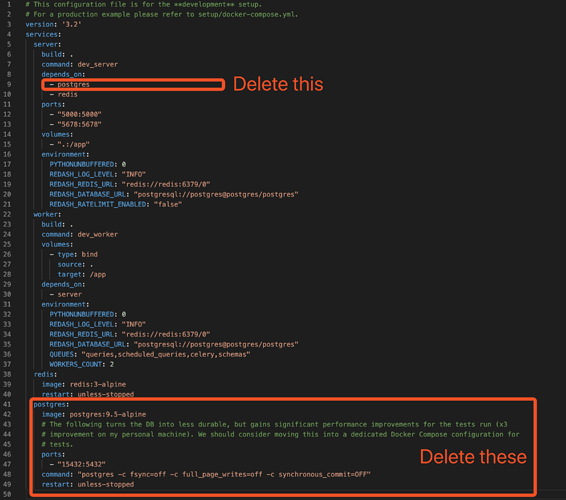
(1).As shown above, remove the code associated with postgres
(2).Modify the REDASH_DATABASE_URL: “postgresql://postgres@postgres/postgres” in two places
REDASH_DATABASE_URL: "postgresql://UserName:PassWorld@Host:Port/DataBaseName"

# Explain:
# UserName: the UserName of the postgres database that you installed and deployed yourself
# PassWorld: the password for the postgres database you installed and deployed yourself
# Host: the IP address of the server on which you installed the deployed postgres database
# Port: you can install the Port number of the deployed postgres database (if the pg database and redash are not on the same server, remember to open the firewall Port).
# DataBaseName: the name of the database you create, such as "redash_v8"
Step 6: generate web page resources
The following instructions are executed in the redash directory:
npm install  # Install dependent software,may take many minutes

npm run build  # generate web page resources
Step 7: create the data table
# The following instructions are executed in the redash directory:
docker-compose run --rm server create_db  # May take many minutes```
Step 8: start redash
# The following instructions are executed in the redash directory:
docker-compose up  # Build image, startup redash, Redis, celery service. May take many minutes

# After the service starts, type http://youhost:5000 in your browser, unsurprisingly, you will see the redash home page

# If you want to start in the background, use the following command:
   docker-compose up -d
# If you need to terminate redash and related services, execute the following instructions:
   docker-compose stop
